
Having aesthetically pleasing Anki flashcards is one of the things that makes me wanna do my reviews. And, it’s not only about having pretty colours and fonts. But also, organizing the cards’ content in a way that makes it more memorable and easier to grasp.
take a look at some of my favourite styled notes. and see how they look on both the desktop app and Ankidroid


And, since a lot of fellow Ankiers have been asking. I decided to start publishing tutorials on the topic of styling Anki flashcards.
These tutorials are for the non-techies. Those who know nothing about HTML and CSS. yet, still want to have a beautiful reviewing experience.
Before we start, I recommend you install the Card Layout Editor addon. As syntax highlighting is super useful. It would also be great if you have read Anki’s manual about styling cards.
Now, let’s start with today’s tutorial.
Changing Anki Cards Background
In this post. we will get a grasp of how we will work and I’ll also show you different ways to change your cards’ backgrounds. It’ll be a simple tutorial to start getting your hands dirty.
For the purpose of this tutorial, I have created a new note type (cloned from the basic card type). and I have a simple card that has “Egypt” on one side and “Cairo” on the other.
I recommend you start by experimenting on a new note too. So, if something went wrong at first, your cards would be intact.
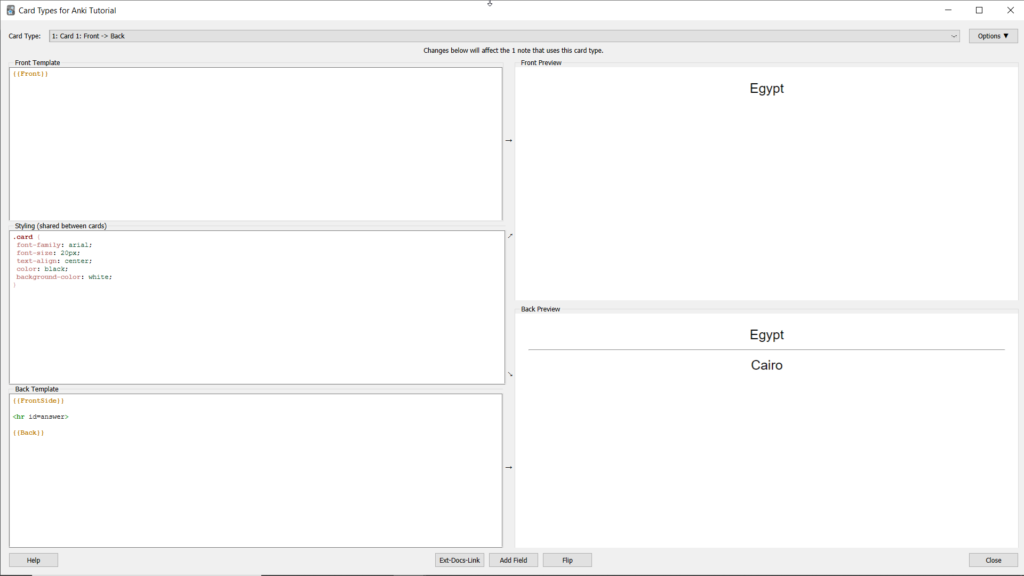
You must be familiar with the main three sections we have while editing our notes
- The front template
- The styling
- The back template
The styling part is where we will put our CSS. CSS is a language used for styling web pages. It works like that:
let’s say you want to apply a certain styling to the text on the front field. like font colour, font size, font family, maybe a background colour, or all of these together.
you give that field a “class” name. and then, through the CSS you define the properties of that “class“
Good, How to do that?
There are numerous ways to do it but for the sake of simplicity, I’m gonna stick to the same routine most of the time. Because, again, this is intended for people with no prior knowledge of HTML and CSS.
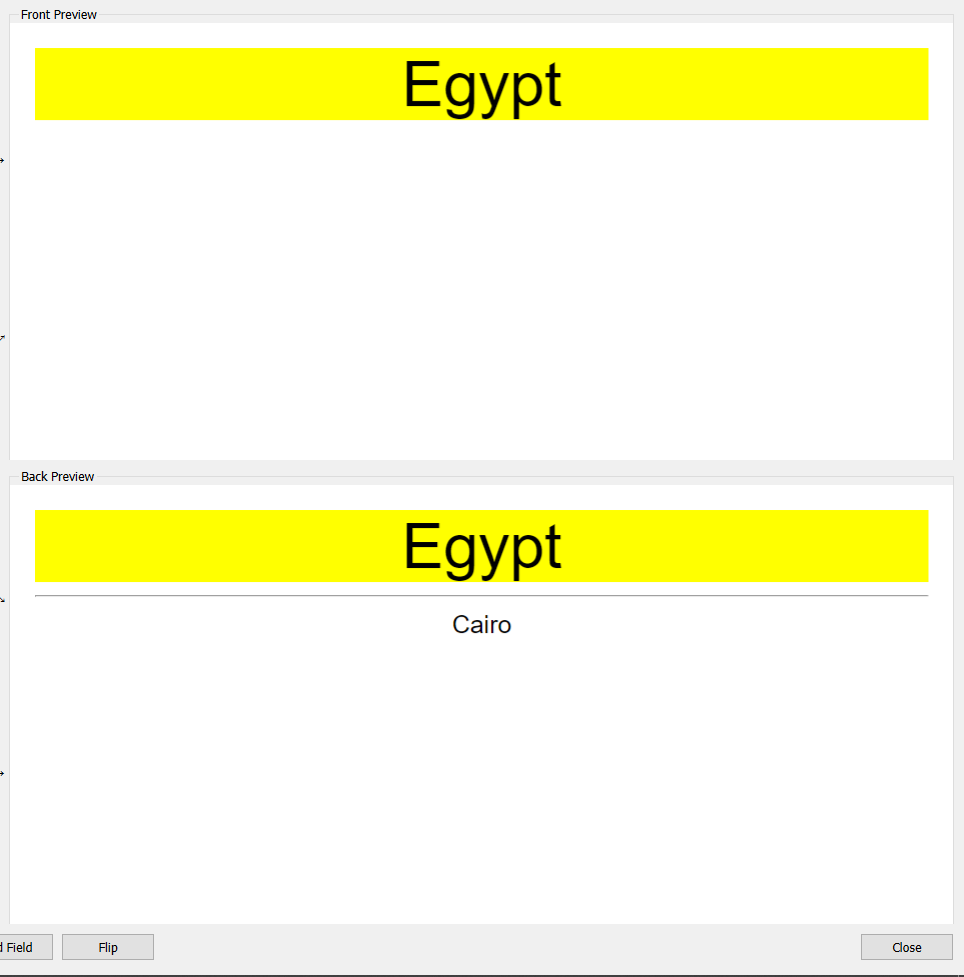
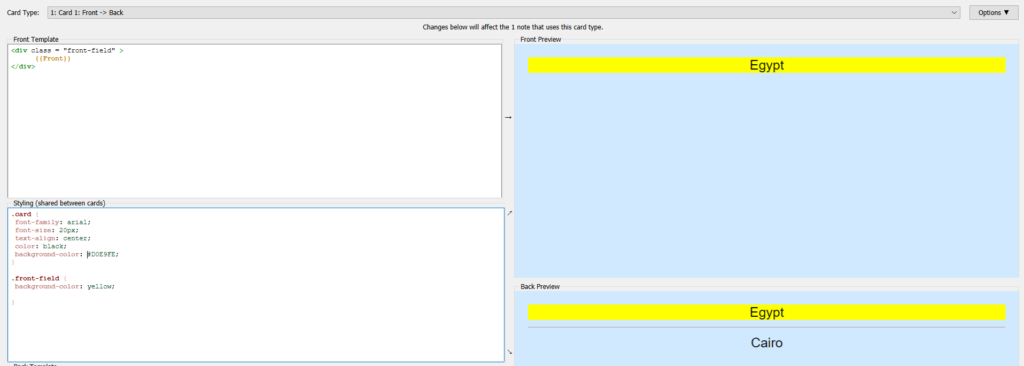
So Let’s apply on the Front field (which has the word Egypt in it in this card) This is what the Front template looks like before any editing
{{Front}}First, we wrap it into an HTML element called “div” like this
<div>
      {{Front}}
</div>
Then we give that “div” a class name (or maybe more than a class!)
<div class="front-field" >
      {{Front}}
</div>
Now, we move into the styling section and after Anki’s default code we add our class so the section should look like this.
.card {
 font-family: arial;
 font-size: 20px;
 text-align: center;
 color: black;
 background-color: white;
}

.front-field {


}
What we need to do now is decide which style properties we want to apply. Find out how to write them in CSS. And finally, editing our class to add them.
let’s say we want to give the Front field a yellow background. you can do a simple google search of “CSS background colour” and you’ll find your answer right away or you can look through the list on the left here to find all the CSS properties and what values you can assign them.
So, After adding the background colour property and also, a font size to our class the styling section will look like this.
.card {
 font-family: arial;
 font-size: 20px;
 text-align: center;
 color: black;
 background-color: white;
}

.front-field {
 background-color: yellow;
font-size:50px;
}
And the card now looks like this
Okay, so now you started to understand how things work out. Let’s move on to the main part of the tutorial.
styling the background
I’ll cover 4 ways you can style your background:
1. Adding a simple colour to the background
This is the simplest way you can change your background colour. All you need to do is edit the default class the “.card” class that comes with Anki. and change the value of
background-color: white;To any other colour.
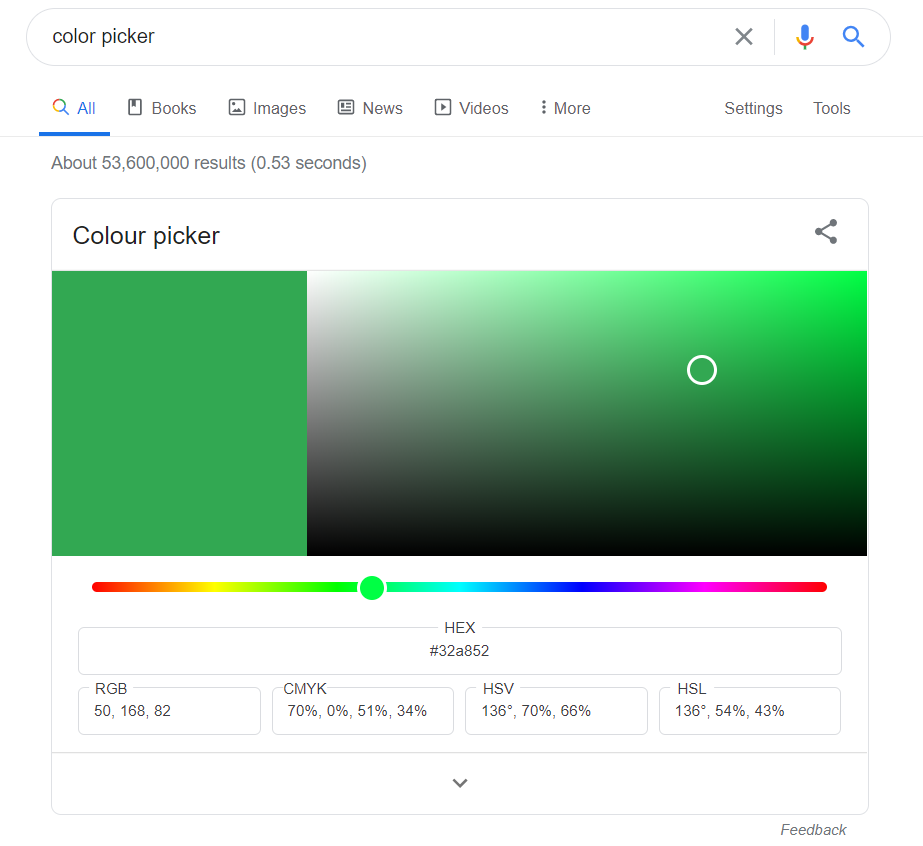
Okay, but how are colours are expressed in CSS?
Tare millions of available colours, billions if you counted transparent colours too. They could be expressed in either what’s called:
- HEX code. examples: #000000 for black, #ffffff for white, #ff0000 for red , 00ff00 for green and 0000ff for blue.
- RGB values or RGBA values for transparent colours. example: rgb(255, 0, 0) for red , rgb(0, 255, 0) for green.
- Also, some colours could be expressed by their names without any codes Here’s a list of those colours with their names.
To pick your wanted colour you can use a colour picker tool like this, or this or simply type “colour picker” in Google.
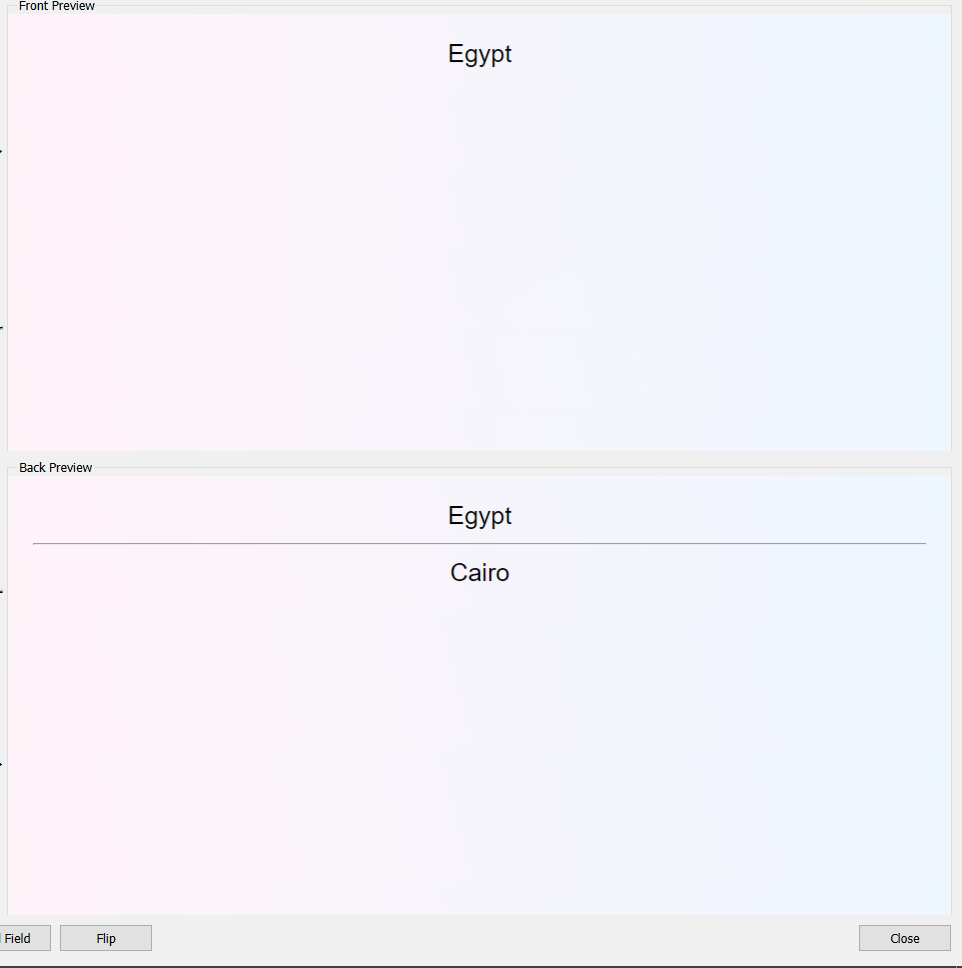
Here’s how my cards look like after changing the default white background.
2. Adding a gradient to the background
For this, we can use a gradient generator like this one, or that one. customize how you want the gradient to look and copy the resulting CSS code and paste it into the .card class
Here’s how my code looked like after picking a gradient
.card {
 font-family: arial;
 font-size: 20px;
 text-align: center;
 color: black;
background: rgb(255,243,248);
background: linear-gradient(76deg, rgba(255,243,248,1) 0%, rgba(238,246,255,1) 100%);
}
and here’s my card
3. Adding an Image Background
This is my favourite and most used way. I love to add a different background colour to each note type.
First, you need to navigate to your “collection. media” folder, create a new folder, and call it “_backgrounds”.The underscore at the beginning is important. So, Anki doesn’t delete your images while “checking media”.
Also, you’ll need to make sure this folder exists in your “collection. media” folder on your phone too. to, work on your phone.
Add your desired background images here and rename them to something meaningful, I use the deck name usually. I have a nice picture of a map that I’ll use here.
Now you are ready to edit your code. All you need to add is a “background-image” property like this:
.card {
 font-family: arial;
 font-size: 20px;
 text-align: center;
 color: black;
 background-image: url("_backgrounds/Ultimate Geography.jpg");

}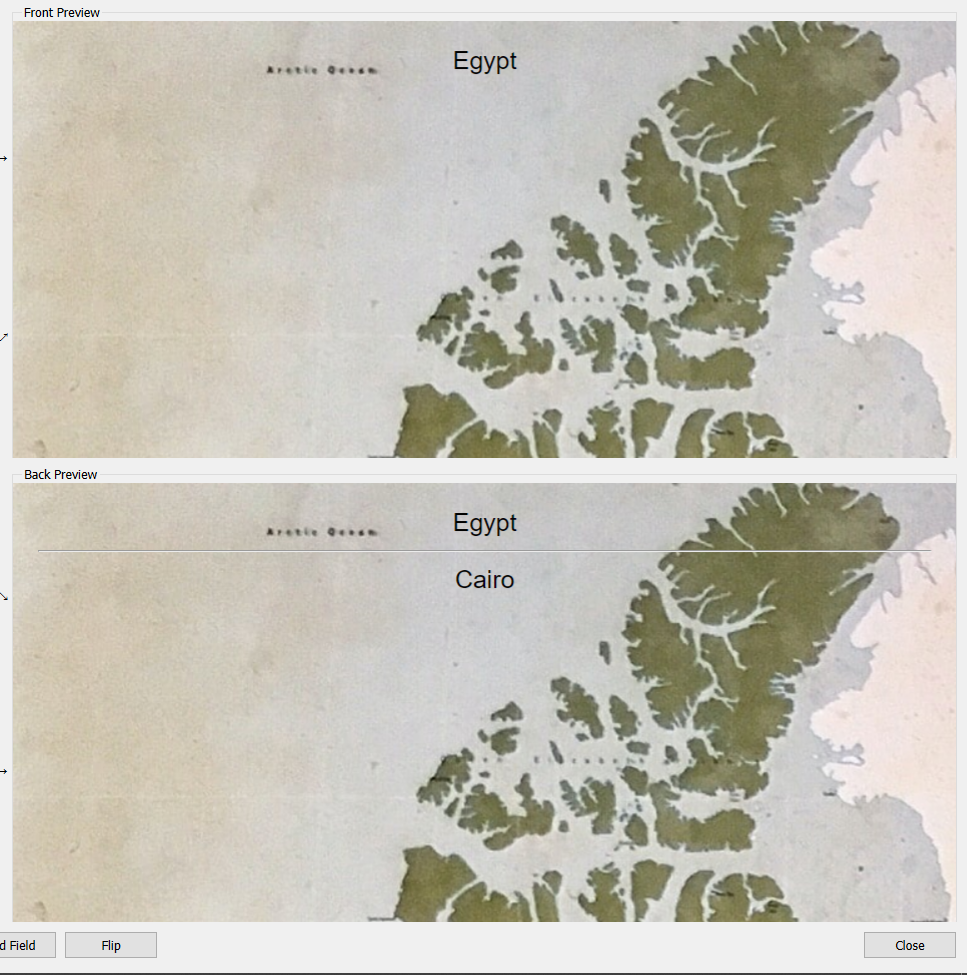
I noticed that the image isn’t resized properly so I added another property “background-size” to fix this.
.card {
 font-family: arial;
 font-size: 20px;
 text-align: center;
 color: black;
 background-image: url("_backgrounds/Ultimate Geography.jpg");
 background-size: 100%;
}
And now, I have the whole world!

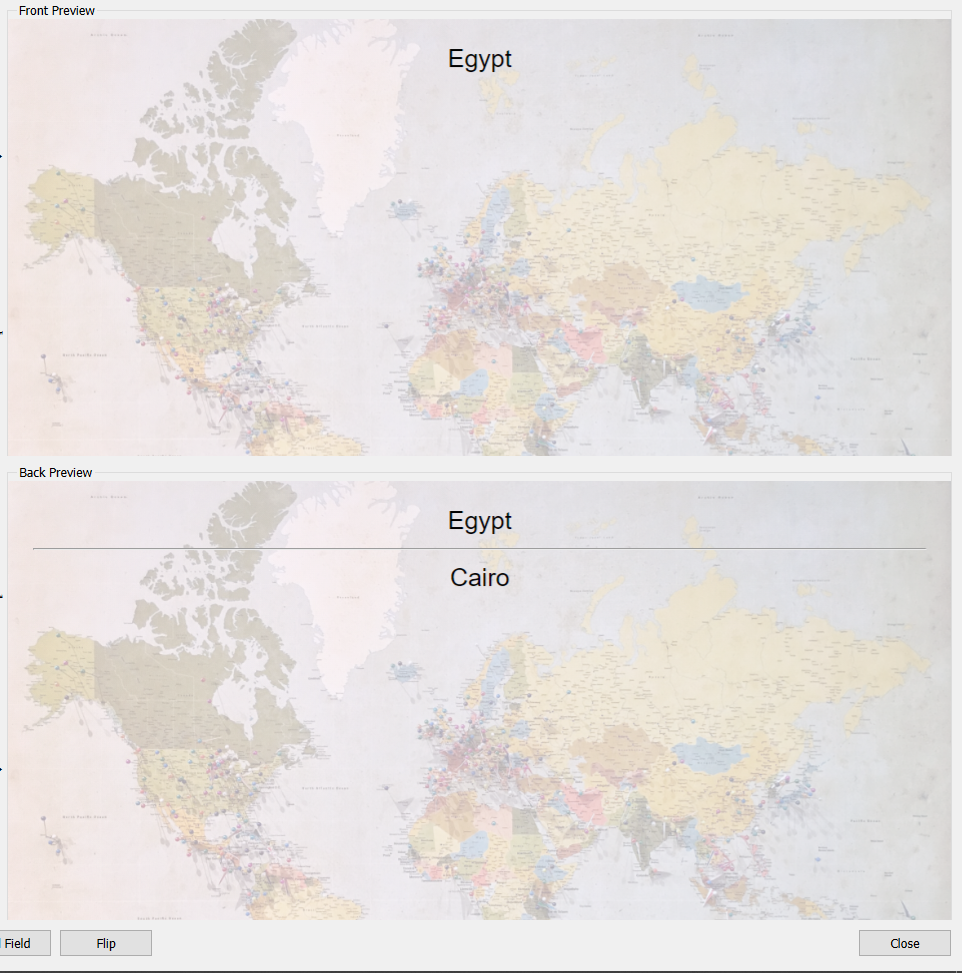
4. Adding an image with an overlay gradient
The background images are nice. But, they are not that great for visibility. To fix that, you can either, edit your images using any image editor before using them. Or, do it with CSS.
This is the value of the gradient I used before.
linear-gradient(76deg, rgba(255,243,248,1) 0%, rgba(238,246,255,1) 100%);notice the 1 in rgba(255,243,248,1) and rgba(238,246,255,1). It stands for the opacity ratio which can range, you guessed it, from 0 to 1. I’ll change it to 0.7 and use it with the image I used before. And the code should look like this
.card {
 font-family: arial;
 font-size: 20px;
 text-align: center;
 color: black;
 background: linear-gradient(76deg, rgba(255,243,248,0.7) 0%, rgba(238,246,255,0.7) 100%), url("_backgrounds/Ultimate Geography.jpg");
 background-size: 100%;

}
And here’s a better-looking result
So, That’s it for today. There are more properties you can use like background-repeat and background-position but I’ll let you experiment with those.
Don’t forget to check my other Anki posts too.
Happy Anking!